Pompom Ladybug
Make a fluffy ladybug with this fun craft project.
Copyright © 1999-2009 Susan Spatone All rights reserved.
Published with permission from CraftAtHome.com
Pompom Ladybug
Supplies:
- Pompoms:
- 1 medium red
- 1 smaller black
- 5 teeny black
- Tacky glue (hot glue for big kids)
Black Floral wire or heavy thread
Scissors
What You Do:
These are so much fun and make fabulous bulletin board pins and great pins to wear!
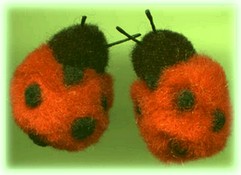
Begin by cutting one side of your red pompom flat. The ladybug has a flat tummy, so you'll need to trim away one side for this.
Cut a "V" shape into the red pompom (this will be where the black and red meet at the neck of the ladybug). Don't cut the "V" too large. To test, before you cut away too much, insert your black pompom in the opening to measure for a nice fit.
At the very point of your "V", and near the top, glue a teeny black pompom. This helps to make the edge around the neck a little smoother. Next, glue a black pompom in place for the face.
Glue four teeny pompoms over the body of the lady bug (randomly), referring to photo.
Glue two pieces of floral wire or heavy thread to centre of the face as the antenna.
If you would like to use these as push pins for your bulletin board, glue a tack to the tummy area; you could also glue on a small magnet to attach the ladybug to your fridge or locker.

Another idea (kids love these) is to make a pin to wear. Simply glue a pin back (available at craft shops) to the ladybug's tummy area.
You can also decorate clay pots or kid's rooms - and, of course, make giant ones for your cat to play with.
No comments:
Post a Comment