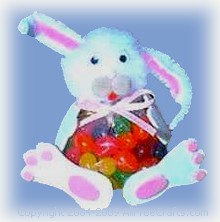
Easter Bunny Jelly Bean Bag
by Twila Lenoir
Copyright © 2004-2009 AllFreeCrafts.com
Dress up a plastic bag full of jelly beans - learn how to make an Easter bunny jelly bean bag!
Jelly Bean Bag Easter Bunny
Supplies:
plastic bag
popsicle stick or craft stick
one 2 inch white pompoms
two small tan pompoms
small amounts of pink and white craft fun foam
one medium white pompom
one tiny red pompom
one white bumpy chenille stem
one pink chenille stem
7mm goggle eyes
plastic bag
popsicle stick or craft stick
one 2 inch white pompoms
two small tan pompoms
small amounts of pink and white craft fun foam
one medium white pompom
one tiny red pompom
one white bumpy chenille stem
one pink chenille stem
7mm goggle eyes
Jelly Bean Bunny
Instructions:
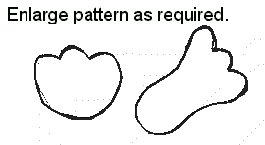
1. You will have to enlarge the Pattern for feet and hands. Print and cut out the two pattern pieces then trace onto white fun foam. Cut out two feet and two hands.
2. Cut the bumpy chenille stem so that there are two bumps on the stem. Fold the stem in half so that the two bumps are together and the folded part of the stem is at the top. Now with the pink chenille stem, cut a piece that is about the length of the bumpy stem. Glue in the center of the two bumpy stem ears. This makes one of the bunny's ears; make another one and set both ears aside.
3. On the 2 inch pompom, the bunny's head, glue on the two tan pompoms together for the cheeks. You can also use white, but I thought that it would be hard to see. Glue the tiny pink pompom on top of the two tan pompoms as a nose, then add a tiny red pompom below for the tongue. 4. Don't forget the bunny's eyes, which should be glued above the nose. 5. Glue the two ears on top of the 2 inch pompom head. On mine, one of the ears fell to the side but I left it there, because he looked kinda cute with the one floppy ear.
6. Glue a popsicle or craft stick to the bunny head. If you don't have a stick, you can use a straw.
7. Hopefully, you will have a plastic bag that is suitable in size for the bunny's tummy. If your bag is a little long, cut it down to fit. Fill the bag with jelly beans, leaving enough room so that you can tie the bag closed at the top. Wrap the thin ribbon around the top of the bag and make a bow in the front - but don't tie it too tightly, as you need to insert the bunny's head in the next step!
8. Place the stick attached to the bunny's head into the top of the bag, wiggling it through the bag opening and the jelly beans. When you have it down, put a little glue on the pompom head and push down on the top of the bag.
9. For the feet, use a paper punch to punch out six pink circles of fun foam. Glue these to the feet for toes. Also cut two little pink ovals out of fun foam for the heels. Glue the feet to the front bottom of the jelly bean bag. 10. Glue the white hands to the sides of the bag. Now you have a cute bunny bag! Oops - don't forget to glue the white medium pompom to the back for his tall. You can change the colors around for a boy. Enjoy!
Billie C.
6091/ 6030/4093
http://groups.yahoo.com/group/BackOfTheBox
Success seems to be largely a matter of hanging on after others have let go.
William Feather
6091/ 6030/4093
http://groups.yahoo.com/group/BackOfTheBox
Success seems to be largely a matter of hanging on after others have let go.
William Feather
No comments:
Post a Comment