*********
Can't Believe I Never Thought of This!!
The electricians had to kill the power for about 5 hours today so I had some time on my hands. After the power ran out on my laptop I realized since the panel box was outside I didn't have to stick around so what is a great idea to do when in a few hours you are going to be writing a $1600.00 check? Go shopping!
I managed to get the 30% off code for Kohl's this time so I figured I would put it to good use!

Now while in Kohl's I kinda had a duh moment. I haven't been able to wear pierced earrings for at least 15 years. And I don't care what you say, when you can find them the clip earrings just aren't that cute. I usually end up with two pair of silver that I rotate.

I noticed these while looking through the clearance and the idea hit me! I have clip findings at home so I looked at the post thinking that if they were at the top I could at least cut it down with wire cutters. All of these had posts at the top and most of them came off cleanly.

Then I glued the clip findings with E6000.

For the first time in a very long time I have 4 brand new pretty earrings! And at a great price!

I managed to get the 30% off code for Kohl's this time so I figured I would put it to good use!

Now while in Kohl's I kinda had a duh moment. I haven't been able to wear pierced earrings for at least 15 years. And I don't care what you say, when you can find them the clip earrings just aren't that cute. I usually end up with two pair of silver that I rotate.


Then I glued the clip findings with E6000.

For the first time in a very long time I have 4 brand new pretty earrings! And at a great price!

********
Rosette Key Chains
I saw these cute rosette key chains over at vixenMade a few months back and knew I had to make some.

What you need:
Fabric for rosette
Felt
Ribbon
Hot Glue
Splint Key Ring (I found a pack of ten at Michael's for $1.99 but have also seen on Etsy)

I didn't take step by step pictures because I think the picture below is pretty self explanatory. Make your rosette, hot glue the first end of your ribbon and then fold over and hot glue the second end. Then more hot glue and cover with felt. I used a good amount of hot glue to ensure that it would not come apart. Then I attached the split ring.
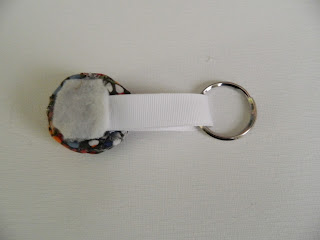
So easy, so cute and and a great way to use up your scraps! They also make great gifts!

*********
Just a Little St. Patrick's Day Craft - A Wreath
I was feeling a little bad that I hadn't put any St. Patrick's Day decor up. Truth is, I don't have any. We do use a lot of green in our living room, does that count? No? Ok, well, I whipped something up this weekend real quick. Just a little extra green to be a little festive. I realize this is probably way late for blog world, but hey, it is what it is.

I created a cute little St. Patrick's Day wreath for our bedroom door. This was one of those almost too easy projects. Love those! I used one of my $1 frames left over from our wedding that I've been using for project after project. Frames can be wreaths too!

I covered my $1 wreath with some green fabric, and cut out the center just like I did with my stenciled music sheet frame. Only instead of using Mod Podge to adhere the fabric, I used hot glue on the back to pull the fabric taunt around the frame.

Once that was done, I took a cute little sparkly shamrock ornament that I found at JoAnn Fabrics for about $2 & cut off the ribbon. I attached it with hot glue to my frame, and I was done! A random piece of yarn was added to hang it by and voila! A new little festive wreath.

I really like the sparkly shamrocks. They are for sure the best part about this. Have you made any decorations for St. Patrick's Day this year?
********
Make a Fabric Covered Mouse Pad
I've been using the same mouse pad at my home computer for years (and years and years). I believe I got it when I started college. It may have been free... I'm not sure, but I haven't been too keen on it for quite some time. But, it's just a mouse pad, so I never thought I should replace it, it just didn't seem like a big deal. Well, over the weekend, I was thinking about what kinds of things I could do with some extra fabric I have laying around. One thing I thought of was the St. Patrick's Day wreath I showed you yesterday, and another thing I dreamed up was covering my mouse pad with pretty fabric so that it is not so funky/scary anymore!

Genius right? I know...
Ok, probably not, but I was happy about it at the time. I went about making my dream of a pretty mousepad a reality. First, I picked a fabric & cut it to size, just using my mousepad as a template & cutting around it with some extra around the edges so that it would fold over to the back. Then I covered the front of my mousepad (the part with the picture) with Mod Podge & stuck my fabric onto it. Flipping it over, I hot glued the edges of my fabric to the back of the mouse pad, carefully folding in the corners.

Then I stuck one of Brendan's medical books on top of it to make sure it stuck & dried good :)

Once that was taken care of, I applied 3 more layers of Mod Podge to the top of the mouse pad over the fabric to seal it & make sure it held good in place.

I waited about a day to start using it so that I could be certain that the glue was all good & dry. I love my new mouse pad now!

It's so cute & the fabric covers it very well! I will be keeping this in mind in the future if I ever get sick of this fabric & want to replace it with another, but for now, I really like how this looks! It's such an improvement from what it was before!

See what I mean, kinda... different. And old. I'm so glad I thought of doing this! Do you use a mouse pad? What does yours look like?
*******

I have seen many of these little mason jar pin cushions around, and decided to make one...and maybe take it a step forward. I dug out my sewing machine this week to make a camera strap cover {tutorial here}, and was looking all over for the supplies that I needed. I had to dig through my sewing box to find my seam ripper and thread scissors, and thought it was a bit ridiculous not to have them all together. So, I took a few minutes, and threw together this cute little mason jar sewing kit!

I put all of my thread down in the jar. Then, I took a little square of fabric and some poly-fill, and covered the lid. Once you slide the ring over the lid, you will get a little poof to put your pins and needles in. Next, I just slid an elastic hair band around the jar to slip my scissors and seam ripper into.

Now, I have everything right where I need it, and it's pretty! I keep it right on my desk, and to be honest, it is inspiring me to get my sewing machine out a little more often!
*********
This is a VERY quick post but I think they are pretty stinkin cute!! I made some Easter hair clips for MC!! I get SOOOO tired of looking for the perfect hair clip to match MC's clothes for the day and now I have found my solution....I will MAKE THEM!!!
Here are the Easter ones!!

I found some cute Easter pins at Walmart and clipped off the safety pins and then glued them to a bobby pin with Gorilla Glue!! That is it....DONE!!!

********
Links:
*********

Billie C.
No comments:
Post a Comment