Tuesday, March 13, 2012

Teri's Crafts Newsletter for March 13, 2012

 
Top of the Day, to you and may you be blessed all day long.  We have sunshine today! In this camper that can mean only one thing, It's going to get hot in here today. I'll be pulling out the shorts from the clothing tub I have in the closet and changing winter for summer this week. Oh, I'll leave a few pairs of sweat-pants out, since I don't like wearing shorts when we go out to eat. We don't go any where fancy, but I'm still not all that comfortable wearing shorts and then sitting in a booth or on a chair where who knows what was just spilled on it, then wiped at with a damp cloth that was just used to wipe off the table. And that's only if the person cleaning the table thinks about wiping up the seats. I bought 3 sweat-shirts over the weekend and plan on turning at least two into jackets for this spring and next fall. I cut straight down the front. poke holes with an awl or seam ripper every inch or so, then crochet around the edges. But soon, I'm going to have a day of trying to finish up ufo's .. (Un-Finished Objects)  Maybe this afternoon I can start on at least one, and get it done. Rocky and Macon are still asleep on my bed, Time change doesn't seem to have bothered them. Barney, on the other hand, Seems to know just what time it is, and for him.. it's time to go potty.


DIY Vintage Candles

By: Lina for Fancy Frugal Life

Need some easy homemade gift ideas? Give these DIY Vintage Candles a try. Working with burlap is a breeze, and it can really match any decor style. Make these candles for a friend, a wedding, or just for yourself!

DIY Vintage Candles

Materials:

  • Online stamp (these were from The Graphics Fairy)
  • Printable linen fabric
  • Burlap fabric
  • Scissors
  • Hot glue gun
  • Pillar candles

Instructions:

  1. Paste your stamps of choice into a Word document and print them out on the printable fabric.

    DIY Vintage Candles
  2. Measure around the candle to see how long your fabric strips need to be, then cut out the linen strip. Cut the burlap strip a little bigger than the linen strip.
  3. Hot glue the strips to the candles. Add ribbons if you'd like!

How to make Rainbow Glitter Shoes

rainbow-glitter-shoes

In honor of St. Paddy's day, I decided to make the ultimate in glitter shoes...a pair of Rainbow Glitter Shoes! Hmm, maybe I should call them Double Rainbow Glitter Shoes! Haha! Here's how you make them!

rainbow-glitter-shoe-supplies


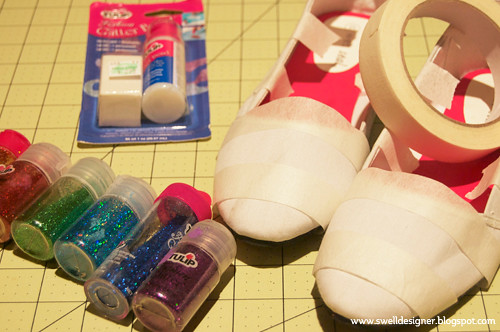
Gather your supplies! You'll need:
Tulip Fashion Glitters in a rainbow of colors
Tulip Fashion Glitter Bond
– masking or painters tape
– paper plate
– shoes (of course!)
– clean work surface
– small paintbrush
– several pieces of extra paper
– hairspray
– cleaning wipes

Before you begin: I recommend that you also do a coat of masking tape inside your shoes. You will get less glitter inside the shoe this way and have less of a mess! I didn't do this and if made these again, I would have!


apply-glitter-bond

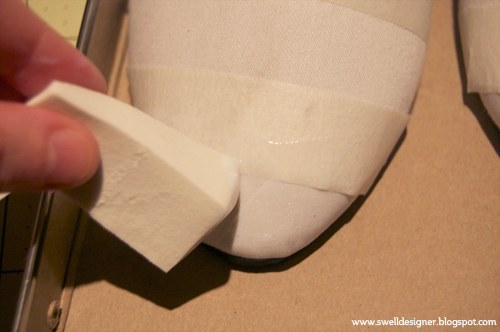
First mark off your shoes in even width stripes using your painters tape. Squeeze out your glitter bond and cover the surface of the first exposed stripe, making sure to completely cover it in the adhesive.

apply-first-coat-of-glitter

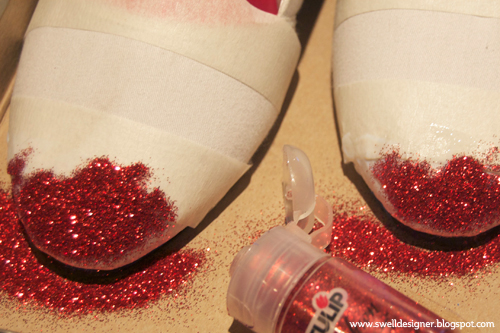
Next sprinkle on your first color of Fashion Glitter. I created my shoes in the color order of ROYGBIV (Red, Orange, Yellow, Green, Blue, Indigo, and Violet) Make sure to coat around the entire shoe. This is where that extra paper comes in handy! If you lay the paper down before you begin, you can reuse the excess to cover the parts you missed in the first round.

apply-third-coat-of-glitter

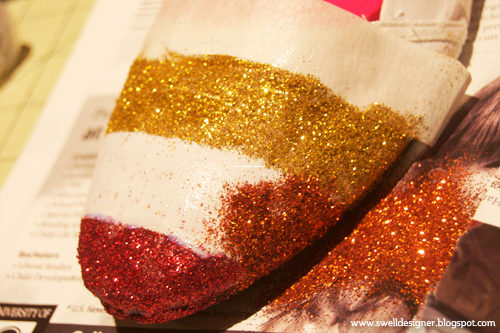
I did the third color (gold) next. Once finished with that section, I ripped off the painters tape in between and applied the Glitter Bond, then filled in with the orange glitter.

Repeat this pattern until you are done. If there are any small areas that you missed, use a paintbrush to apply Glitter Bond in those areas, then go back in with the matching color.

rainbow-glitter-shoes-2

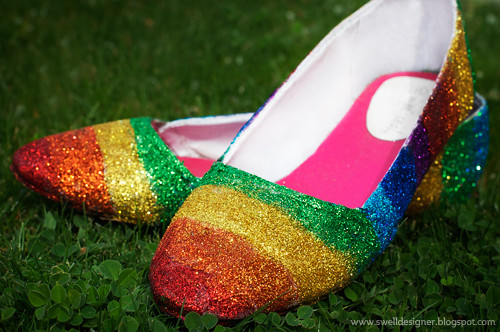
Once finished, use hairspray to lightly coat the entire area of both of the shoes! This helps them from flaking off and glitter getting on everything!

Now go out and rock your brand new multi-colored kicks on St. Paddy's day and every day!

 
Finished Bunny Ornaments
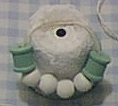
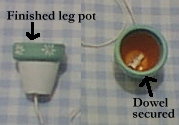
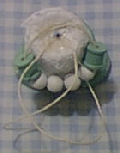
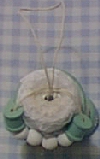
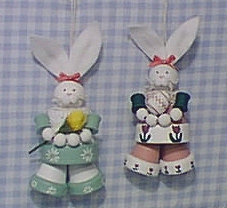
Terra Cotta Bunny Ornaments....April 2000

Materials Needed:

  • Terra Cotta Flower Pots with holes in the bottom
    • One pot that is 1-1/2" in height
    • Two pots that are 1-1/4" in height
  • Acrylic Craft Paint
  • Paintbrush
  • Toothpicks
  • One 25mm Round Bead
  • Two spools that are 1/2" x 1/2"
  • Twine/String
  • 3/4" Lace (approx. 4" piece for one bunny)
  • Four 10mm Round Beads
  • Small wooden eggs (Wren Egg) or Small Flowers
  • Felt Pieces (White)
  • Craft Wire
  • Hot Glue Gun
  • 1/8" Dowel
  • Two White Pompoms that are 7mm in size
  • 1/8" Ribbon (any color)

Prepare the Pots:

  • Wash the terra cotta pots with mild soap. Let dry completely.
  • Paint pots, spools, beads, and egg if using.
Create the body:
  • Turn the large pot upside-down so that the narrow end or bottom of the pot is now the top.
  • Glue the lace around the top, narrow, edge of the pot to form a lace collar.Photo 1
  • Cut a piece of string approx. 5 inches long.
  • Thread the string through one spool and then the four 10mm beads, then the other spool.
  • Holding the ends of the string, position the spools and beads against the pot so that the top edges of the spools are just slightly below the top, narrow, edge of the pot.
  • Hot glue the string into position on the top of the pot. (Be careful not to cover the hole)
  • Trim off the excess string. (These steps are shown in the photo)
Create the legs:
  • Cut a piece of dowel that is about 1/4" long.
  • Cut a piece of string that is approx. 4" long.Photo 2
  • Tie one end of the string around the piece of doweling.
  • Inside one of the small pots, thread the other end of the string through the hole in the base. (Do not pull completely through to the doweling yet.)
  • Add some hot glue to the base of the pot on the inside.
  • Now pull the string completely through to hole, making sure that the doweling rests against the hot glue inside the base of the pot.Pattern
  • Do the same to the other small pot.
Create the Head:
  • Paint the eyes, nose, and mouth onto the 25mm bead.
  • Fray some string to make whiskers.
  • Center the whiskers below the nose and glue them on.
  • Take the two pompoms, press them together firmly and glue them over the whiskers.
  • Using the graph pattern provided, cut out felt pieces for the ears. (The graph is 1" x 1").
  • Cut two pieces of craft wire that measure 2".Photo 3
  • Curl one tip of each piece of craft wire.
  • Now, on the back of the larger ear piece, lay a strip of glue almost as long as the smaller ear piece.
  • Place the wire in the glue with the curled tip at the top.
  • Lay the smaller ear piece over the wire, covering the wire and glue.
Put the body together:
  • Take the small pots (leg pieces) and the large pot (body piece), Thread the string from a leg up inside of the large pot, through the hole.Photo 4
  • Outside the pot, hold the end of the string toward you, laying the string against the top of the large pot.
  • Adjust the string so that the base of the small pot is just out of sight, hidden under the edge of the large pot.
  • Hot glue the string against the base of the large pot just outside of the hole. (See photo)
  • Repeat with the other small pot, being careful to make the legs look even.
  • After the glue has set, tie the two hanging pieces of string together, keeping them as flat as possible.
  • Glue the tie down and trim the extra string off.
  • (Practice setting the head bead on the body. If any of the string shows, cover it by gluing a small piece of lace over the area.)
  • Cut a piece of string long enough to hang the ornament, approx. 7".
  • Tie the ends together into a knot.Photo 5
  • Thread the looped end of the string through the inside of the large pot. (Make sure that the knot does not go through.)
  • Hot glue the knot to the inside base of the large pot.
Put the head on:
  • Cut a piece of dowel that is about 2" long.
  • Glue the head to the dowel by placing a strip of glue on the dowel and carefully guiding it into place. (Important Tip: The string hanger and the wood dowel both have to fit through the bead hole in the head. To make sure that they both fit through nicely, glue the dowel into the head against the front or against the back so that the string hanger can easily and evenly slide through the opposite side of the hole.)
  • Thread the looped string hanger through the head and at the same time, guide the doweling through the hole in the body.
  • Before pulling them completely together, hot glue around the hole on the large pot where the head will touch. Pull the head down tightly in place.
  • Place a string of hot glue along the wire end of the ears and insert it into the head.
  • Repeat with the other ear.
  • Make a small bow with the ribbon and glue it to the base of the ears.
  • Glue the egg or a flower to the body so that it is resting slightly on the beads (hands).
- use to organize pony tail elastics; push the elastics around on the ring until you can remove the one you want to use. I think you could use one in the same way to store plain rubber bands as well.
 
- stick a couple to the oven door handle to keep potholders or oven gloves handy - this is best with the C shaped shower hooks that don't clip together
- when you have lots of shopping bags to bring in from the car, slide the bag handles onto a shower hook for easier carrying
 
- use to hang tools, mops, brushes etc from wire shelving
 
- hang toys for your pet birds with a shower hook
 
- use shower hooks outside to hang hummingbird feeders or birdseed bells from branches
 
Crayon Caddy
Here's what you need:
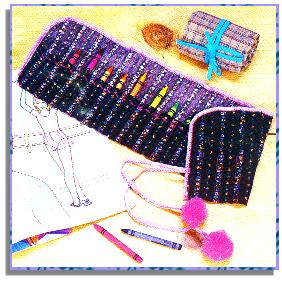
A piece of calico or gingham. 11 1/2" x 16 3/4" for large crayons, or 9 1/2" x 20 1/2" for regular ones; two yards single- or double- fold bias tape for either caddy; yarn pompons in a complementary color, if desired; matching sewing thread; crayons.

Here's how:
1. Hem one long side of the caddy with a 1/2 inch-deep hem.

2. Fold this hemmed edge up 3 1/2 inches for large crayons, 3 inches for regular ones.

3. Begin 1/2 inch from each end and stitch compartments for crayons: each 1 1/8 inches wide for large crayons, each 1 inch wide for regular ones.

4. Round corners of the flap and bind raw edges around with bias tape as shown in illustration.

5. For ties, cut a strip of bias tape 22 inches long and sew folded edges together. Mark center of crayon compartments and sew center of tie strip to this point.

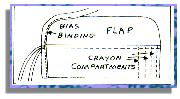
6. Attach yarn pompons to ends of ties, if preferred.

The ones I have made the kids just love them, and plus there crayons are not laying all over the place. They also make great gifts!


Christmas stocking stand

Christmas Stockings

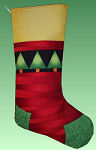
Christmas Stocking Pattern

Use our cut and sew fabric panels or your own fabric with our free pattern to create beautiful Christmas stockings!


See More Holiday Patterns

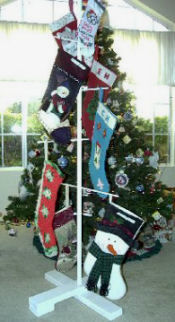
This makes an adorable Christmas stocking tree. It can also be used for hanging other items, such as holiday banners, small quilts, artwork etc.

A coat or two of paint and a tree skirt to hide the base, and it's all finished! Your own choice of paint, added glitter and other decorations will make it uniquely your own.


All Patterns, images and instructions are copyright protected.
Please read our Terms & Conditions before using our patterns.


MATERIALS

Branches
round wood dowels cut to the following lengths:
26", 22", 18", 14", 10"
We used a dowel of 1/4" diameter. The thickness of the dowel is your choice, but it must fit through the main post and it must be strong enough to hold your stockings when they are full. If your stockings will be heavy, you may want to use larger dowels for the branches, a larger trunk, and slightly larger base.

Trunk (main post)
One wood dowel of 1" diameter, cut to about 68" length.

Base
Cut a 2" x 4" board into two sections that each measure about 2 feet. Cut two more squares from the 2" x 4" board that measure 4" x 4".

Other Materials
Drill, saw, glue, nails, hammer
Paint
Paint brush
Glitter and other decorative items of your choice

ASSEMBLY

Tree
1. Measure down about 6" from the top of the trunk and mark the spot with a pencil.

2. Measure 24" from the bottom of the trunk and mark the spot with a pencil.

3. Measure the distance from your top mark to your bottom mark and divide by four. At equal distances from one another (which is the number you got by dividing by 4), make three marks between the top and bottom mark.

4. Your shortest branch will be at the top, and each branch down gets longer. Your longest branch will be on the bottom of the trunk. Drill a hole for each branch, drilling each hole PERPENDICULAR to the one before it. Hole should be a size that creates a tight fit for the dowel. We drilled each hole to 1/4" and then sanded the dowel just enough so it would fit through tightly.

5. Push your branch through the hole.

Base
1. Glue or nail the two base squares onto the underside of one of your base cross pieces, even with the ends, to serve as "feet". (refer to photo).

2. Glue or nail the two base cross pieces together, with the piece with feet on top, and with the two pieces perpendicular to one another.

3. Drill a hole into the center of one of your base pieces, large enough to accomodate your trunk.

4. Glue or nail your trunk into the base.
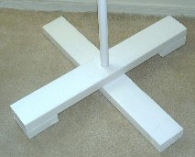
NOTE: You can change the dimensions of your tree, but be sure that the base is large enough to accomodate the tree when fully loaded. If your base is not wide enough, your tree will tip over!
 
 
Links:


No comments: