Tricycle Diaper Cake Tutorial
I love when I have an opportunity to try something new. Even when it is just new to me. I have a baby shower to go to tonight and the gifts are supposed to be practical, i.e. diapers, wipes, etc. (baby #5, boy #4) and so I thought I'd try my hand at a diaper cake. So, I looked on 'the Google' for boy diaper cakes and saw some fun ideas, one being a tricycle which looked easy and fun and cute! First I made sure the hostesses were not planning on doing a diaper cake. I didn't want to step on any toes.
With the green light to proceed, I went shopping. I picked up a pack of size 1 diapers, 2 blue receiving blankets, a pair of blue baby socks, 2 blue bibs, a bottle and some ribbon.
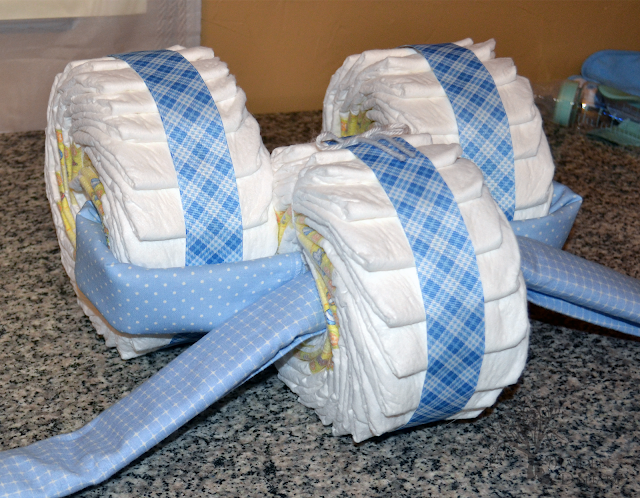
I saw some pictures online showing people using a cake pan to form rounds of diapers. So I tried that and it worked great! I used a regular 8 inch pan and 20 diapers to make each tire. I added one at a time, overlapping about an inch.


Next I rolled the receiving blankets. One of them I added a long piece of yarn down the center before rolling. I fed that blanket through two of the tires, the back of the third (front) tire goes between the back two. I strung the yarn through the front tire, effectively completing a circle. I pulled each end of the string up on top of the front tire, tied a knot to secure the three tires together. Then I shortened the tails of the knot.


With the green light to proceed, I went shopping. I picked up a pack of size 1 diapers, 2 blue receiving blankets, a pair of blue baby socks, 2 blue bibs, a bottle and some ribbon.
I saw some pictures online showing people using a cake pan to form rounds of diapers. So I tried that and it worked great! I used a regular 8 inch pan and 20 diapers to make each tire. I added one at a time, overlapping about an inch.

Once I came around, I tucked the beginning diapers toward the center so the remaining diapers would end up on the outside.

Once all 20 diapers were added, I evened them out. Then I started to gently pull the diaper wheel out of the cake pan and put a rubber band around it to secure the diapers and continued pulling them out of the pan. Then I centered the rubber band and evened out the diapers.

Using my fist, I made a circular opening in the middle of the tires. Then I wrapped ribbon over the rubber bands down the center of the tire. I secured it with double stick tape every 3 or 4 diapers.

Next I rolled the receiving blankets. One of them I added a long piece of yarn down the center before rolling. I fed that blanket through two of the tires, the back of the third (front) tire goes between the back two. I strung the yarn through the front tire, effectively completing a circle. I pulled each end of the string up on top of the front tire, tied a knot to secure the three tires together. Then I shortened the tails of the knot.

Next I fed the other blanket through the front tire.

I placed a bib (puddle guard) on the front tire with the neck portion toward the back. I placed the bottle on top of the bib with the business end toward the back. (The bottom of the bottle becomes the headlight.) Because the bottle was one of those angled kinds I was able to sort of secure it with the bib.

Next, I brought both ends of the second blanket up over the bottle and secured it with a rubber band. Then I took the baby socks and added them to the ends of the blanket forming the handle bars. And then I added the other bib (the seat) with the neck portion going around the handle bars.

Over the rubber band I tied a bow. Then I decided to tuck the top bib under the second blanket.

And it's finished!

Isn't it cute?? I just love that argyle ribbon!

No comments:
Post a Comment